Optimizations
This page contains information and guidelines for improving the reliability, flexibility and stability of your JupyterHub deployment. Many of the settings described is only purposeful for a better autoscaling experience.
To summarize, for a good autoscaling experience, we recommend you to:
Enable the continuous image puller, to prepare added nodes for arriving users.
Enable pod priority and add user placeholders, to scale up nodes ahead of real users’ arrivals.
Enable the user scheduler, to pack users tight on some nodes and let other nodes become empty and scaled down.
Set up an autoscaling node pool and dedicate it to user pods by tainting the node and requiring user pods, which tolerate the nodes’ taint, to schedule on these nodes. This way, only user pods can then block scale down.
Set appropriate user resource requests and limits, to allow a reasonable amount of users to share a node.
A reasonable final configuration for efficient autoscaling could look something like this:
scheduling:
  userScheduler:
    enabled: true
  podPriority:
    enabled: true
  userPlaceholder:
    enabled: true
    replicas: 4
  userPods:
    nodeAffinity:
      matchNodePurpose: require

cull:
  enabled: true
  timeout: 3600
  every: 300

# The resources requested is very important to consider in
# relation to your machine type. If you have a n1-highmem-4 node
# on Google Cloud for example you get 4 cores and 26 GB of
# memory. With the configuration below you would  be able to have
# at most about 50 users per node. This can be reasonable, but it
# may not be, it will depend on your users. Are they mostly
# writing and reading or are they mostly executing code?
singleuser:
  cpu:
    limit: 4
    guarantee: 0.05
  memory:
    limit: 4G
    guarantee: 512M
Pulling images before users arrive
If a user pod is scheduled on a node requesting a Docker image that isn’t already pulled onto that node, the user will have to wait for it. If the image is large, the wait can be 5 to 10 minutes. This commonly occurs in two situations:
A new single-user image is introduced (
helm upgrade)With the hook-image-puller enabled (the default), the user images being introduced will be pulled to the nodes before the hub pod is updated to utilize the new image. The name hook-image-puller is a technical name referring to how a Helm hook is used to accomplish this, a more informative name would have been pre-upgrade-image-puller.
NOTE: With this enabled your
helm upgradewill take a long time if you introduce a new image as it will wait for the pulling to complete. We recommend that you add--timeout 600or similar to yourhelm upgradecommand to give it enough time.The hook-image-puller is enabled by default. To disable it, use the following snippet in your
config.yaml:prePuller: hook: enabled: false
A node is added (Cluster Autoscaler)
The amount of nodes in a Kubernetes cluster can increase, either by manually scaling up the cluster size or by a cluster autoscaler. As new nodes will come fresh without any images on their disks, a user pod arriving to this node will be forced to wait while the image is pulled.
With the continuous-image-puller enabled (enabled by default), the user’s container image will be pulled when a new node is added. New nodes can for example be added manually or by a cluster autoscaler. The continuous image-puller uses a daemonset to force Kubernetes to pull the user image on all nodes as soon as a node is present.
The continuous-image-puller is enabled by default. To disable it, use the following snippet in your
config.yaml:prePuller: continuous: # NOTE: if used with a Cluster Autoscaler, also add user-placeholders enabled: false
It is important to realize that if the continuous-image-puller together with a Cluster Autoscaler (CA) won’t guarantee a reduced wait time for users. It only helps if the CA scales up before real users arrive, but the CA will generally fail to do so. This is because it will only add a node if one or more pods won’t fit on the current nodes but would fit more if a node is added, but at that point users are already waiting. To scale up nodes ahead of time we can use user-placeholders.
The images that will be pulled
The hook-image-puller and the continuous-image-puller has various sources
influencing what images they will pull, as it does in order to prepare nodes
ahead of time that may need images. These sources are all found in the values
provided with the Helm chart (that can be overridden with config.yaml) under
the following paths:
Relevant image sources
singleuser.imagesingleuser.profileList[].kubespawner_override.imagesingleuser.extraContainers[].imageprePuller.extraImages.someName
Additional sources
singleuser.networkTools.imageprePuller.pause.image
For example, with the following configuration, three images would be pulled by the image pullers in order to prepare the nodes that may end up using these images.
singleuser:
  image:
    name: jupyter/minimal-notebook
    tag: 2343e33dec46
  profileList:
    - display_name: "Minimal environment"
      description: "To avoid too much bells and whistles: Python."
      default: true
    - display_name: "Datascience environment"
      description: "If you want the additional bells and whistles: Python, R, and Julia."
      kubespawner_override:
        image: jupyter/datascience-notebook:2343e33dec46

prePuller:
  extraImages:
    myOtherImageIWantPulled:
      name: jupyter/all-spark-notebook
      tag: 2343e33dec46
Efficient Cluster Autoscaling
A Cluster Autoscaler (CA) will help you add and remove nodes from the cluster. But the CA needs some help to function well. Without help, it will both fail to scale up before users arrive and scale down nodes aggressively enough without disrupting users.
Scaling up in time (user placeholders)
A Cluster Autoscaler (CA) will add nodes when pods don’t fit on available nodes but would fit if another node is added. But, this may lead to a long waiting time for the pod, and as a pod can represent a user, it can lead to a long waiting time for a user. There are now options to address this.
With Kubernetes 1.11+ (that requires Helm 2.11+), Pod Priority and Preemption was introduced. This allows pods with higher priority to preempt / evict pods with lower priority if that would help the higher priority pod fit on a node.
This priority mechanism allows us to add dummy users or user-placeholders with low priority that can take up resources until a real user with (higher priority) requires it. At this time, the lower priority pod will get preempted to make room for the high priority pod. This now evicted user-placeholder will now be able to signal to the CA that it needs to scale up.
The user placeholders will have the same resources requests as the default user. This means that if you have three user placeholders running, real users will only need to wait for a scale up if more than three users arrive in an interval of time less than it takes to make a node ready for use.
To use three user placeholders for example, that can do their job thanks to pod priority, add the following configuration:
scheduling:
  podPriority:
    enabled: true
  userPlaceholder:
    # Specify three dummy user pods will be used as placeholders
    replicas: 3
For further discussion about user placeholders, see @MinRK’s excellent post where he analyzed its introduction on mybinder.org.
IMPORTANT: Further settings may be required for successful use of the pod priority depending on how your cluster autoscaler is configured. This is known to work on GKE, but we don’t know how it works on other cloud providers or kubernetes. See the configuration reference for more details.
Scaling down efficiently
Scaling up is the easy part, scaling down is harder. To scale down a node, certain technical criteria need to be met. The central one is in order for a node to be scaled down, it must be free from pods that aren’t allowed to be disrupted. Pods that are not allowed to be disrupted are, for example, real user pods, important system pods, and some JupyterHub pods (without a permissive PodDisruptionBudget). Consider for example that many users arrive to your JupyterHub during the daytime. New nodes are added by the CA. Some system pod ends up on the new nodes along with the user pods for some reason. At night when the culler has removed many inactive pods from some nodes. They are now free from user pods but there is still a single system pod stopping the CA from removing the node.
To avoid these scale down failures, we recommend using a dedicated node pool for the user pods. That way, all the important system pods will run at one or a limited set of nodes, so the autoscaling user nodes can scale from 0 to X and back from X to 0.
This section about scaling down efficiently, will also explains how the user scheduler can help you reduce the failures to scale down due to blocking user pods.
Using a dedicated node pool for users
To set up a dedicated node pool for user pods, we can use taints and tolerations. If we add a taint to all the nodes in the node pool, and a toleration on the user pods to tolerate being scheduled on a tainted node, we have practically dedicated the node pool to be used only by user pods.
To make user pods schedule on a dedicated node for them, you need to do the following:
Setup a node pool (with autoscaling), a certain label, and a certain taint.
If you need help on how to do this, please refer to your cloud providers documentation. A node pool may be called a node group.
The label:
hub.jupyter.org/node-purpose=userNOTE: Cloud providers often have their own labels, separate from kubernetes labels, but this label must be a kubernetes label.
The taint:
hub.jupyter.org/dedicated=user:NoScheduleNOTE: You may need to replace
/with_due cloud provider limitations. Both taints are tolerated by the user pods.
Make user pods require to be scheduled on the node pool setup above
If you don’t require the user pods to schedule on their dedicated node, you may fill up the nodes where the other software runs. This can cause a
helm upgradecommand to fail. For example, you may have run out of resources for non-user pods that cannot schedule on the autoscaling node pool as they need during a rolling update.The default setting is to make user pods prefer to be scheduled on nodes with the
hub.jupyter.org/node-purpose=userlabel, but you can also make it required using the configuration below.scheduling: userPods: nodeAffinity: # matchNodePurpose valid options: # - ignore # - prefer (the default) # - require matchNodePurpose: require
NOTE: If you end up not using a dedicated node pool for users and want to scale down efficiently, you will need to learn about PodDisruptionBudget resources and do quite a bit more work in order to avoid ending up with almost empty nodes not scaling down.
Using available nodes efficiently (the user scheduler)
If you have users starting new servers while the total number of active users decreasing, how will you free up a node so it can be scaled down?
This is what the user scheduler helps you with. The user scheduler’s only task is to schedule new user pods to the most utilized node. This can be compared to the default scheduler that instead always tries to schedule pods so the least utilized node. Only the user scheduler would allow the underutilized nodes to free up over time as the total amount of users decrease but a few users still arrive.
NOTE: If you don’t want to scale down the nodes you have, it would make more sense to let the users spread out and utilize all available nodes. Only activate the user scheduler if you have an autoscaling node pool.
To see the user scheduler in action, look at the following graph from the mybinder.org deployment. The graph is from when the user scheduler was enabled for the first time, it is showing the amount of user pods active on five different nodes. When the user scheduler was enabled, two nodes were in time freed up from user pods and scaled down.
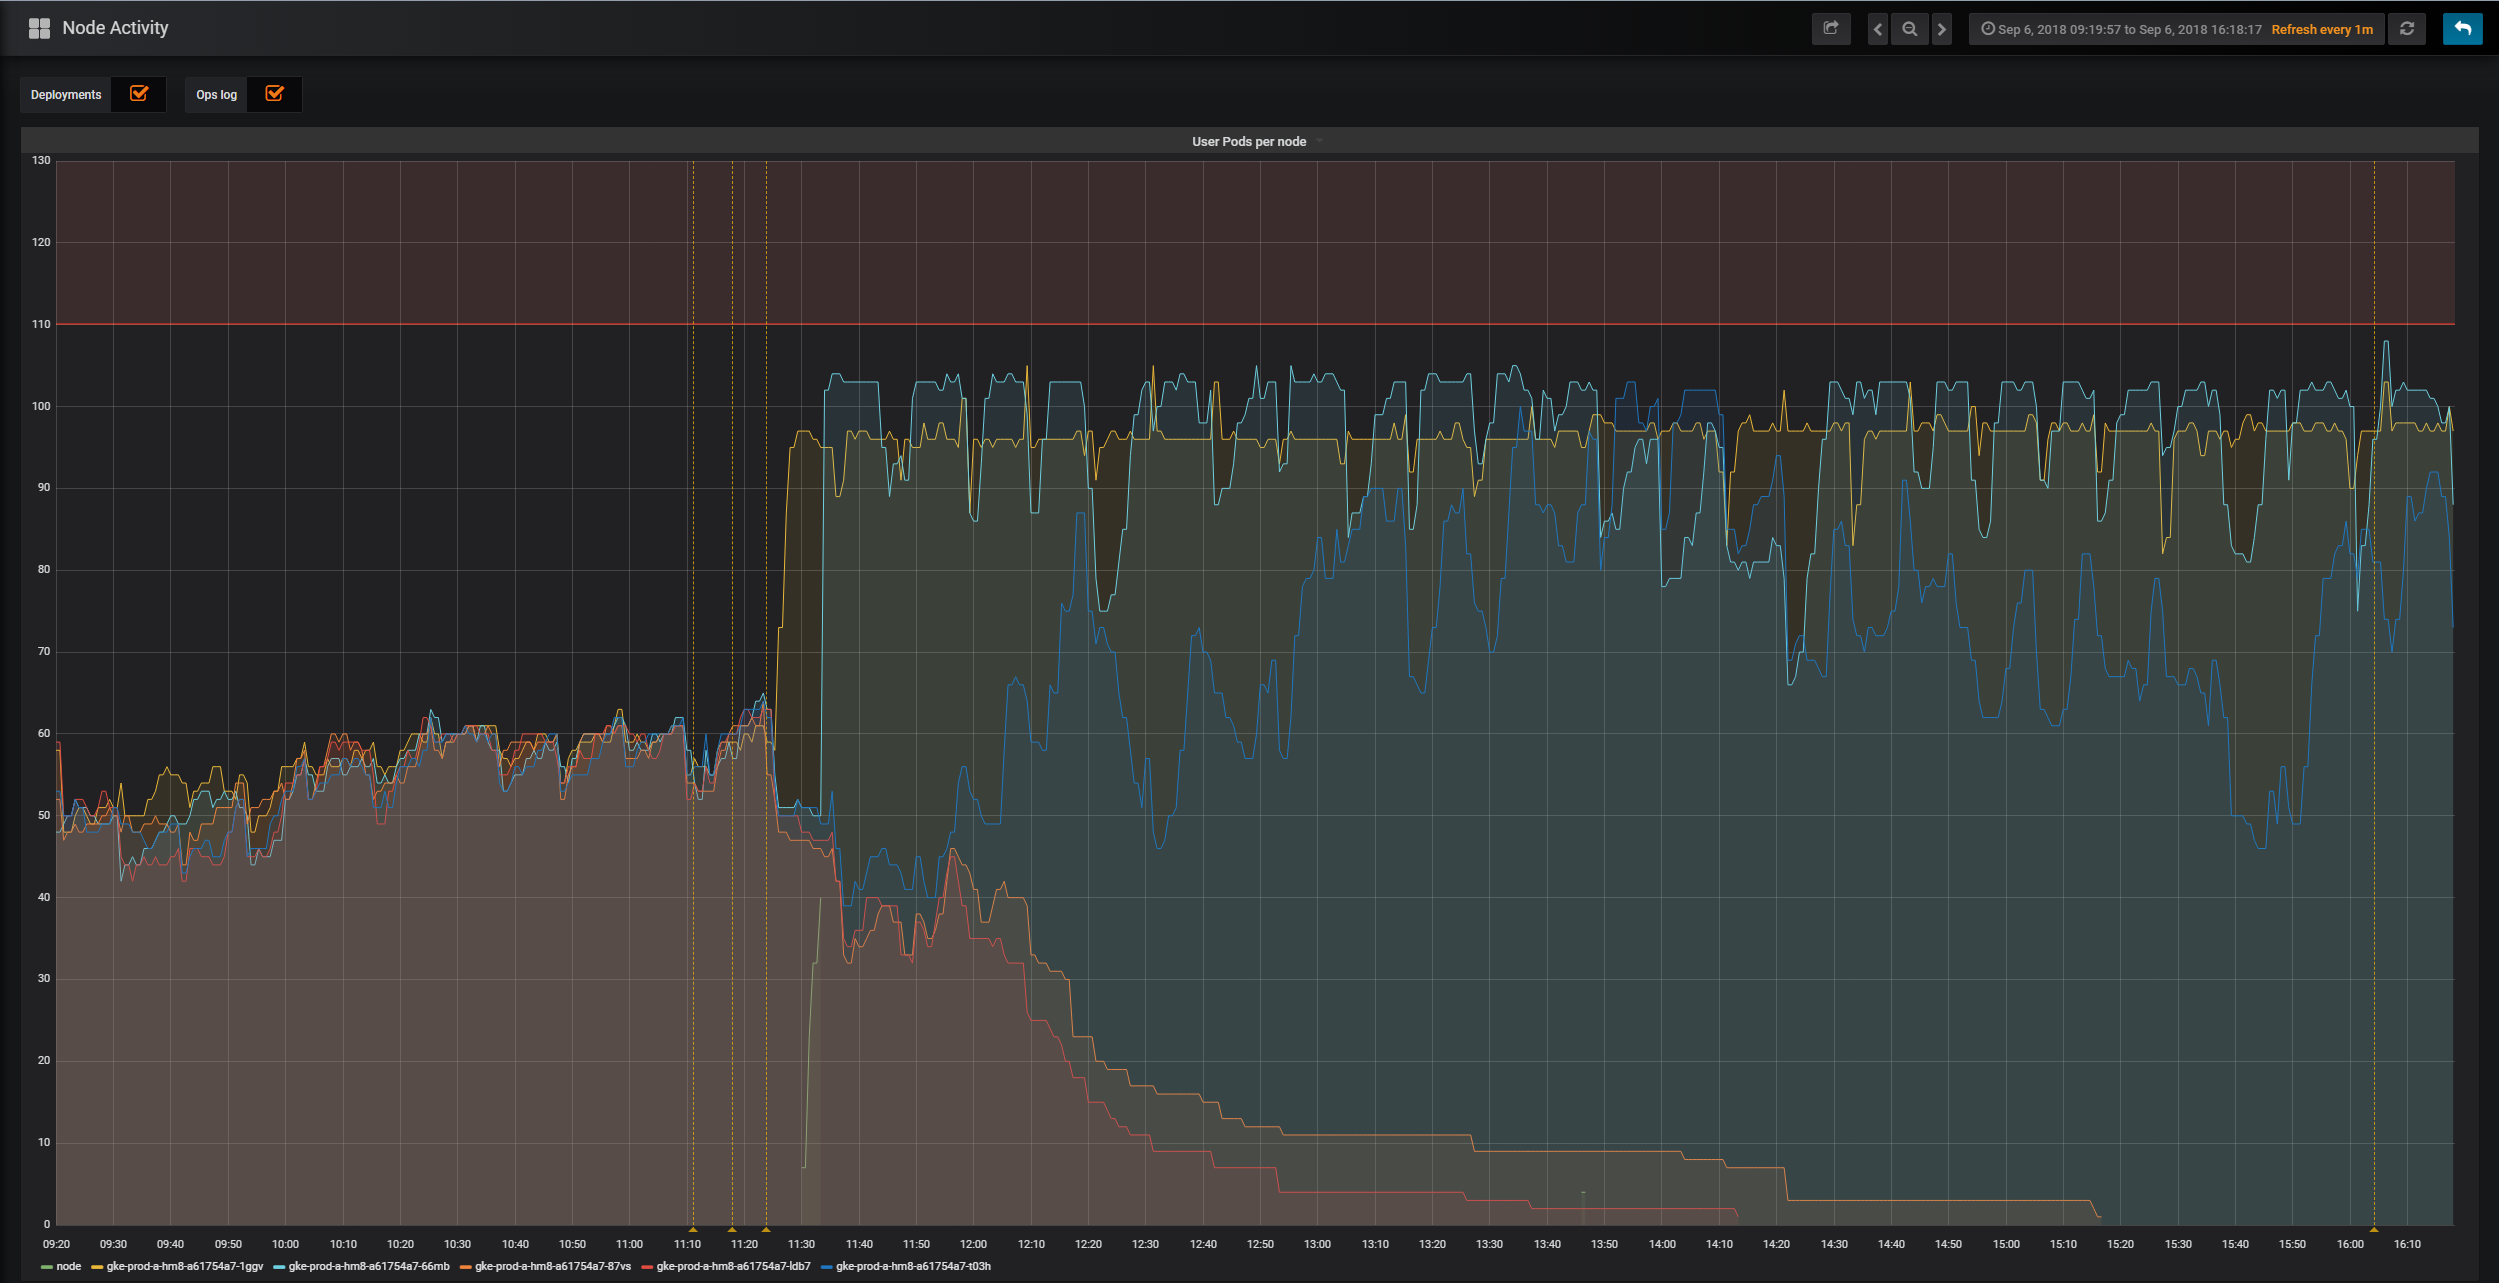 User scheduler node activity
To enable the user scheduler:
scheduling:
  userScheduler:
    enabled: true
NOTE: For the user scheduler to work well, you need old user pods to shut down at some point. Make sure to properly configure the culler.